
Friday, December 25, 2009
Wednesday, December 23, 2009
Teenie Little Star
I posted this on my other blog and then realized I should probably post it over here as well.
I'm practicing a block for the new year.

(For non-US readers, a dime is less than 3/4" in diameter - about 1.75 centimeters.)
I'm practicing a block for the new year.
This is definitely the smallest thing I've made during this process.

Monday, December 21, 2009

L-13
I promise in the New Year I will get back on track with Monday/Thursday blocks. I promise.
An easy one.
Out of background fabric, cut 2 squares 6" x 6" and cut each in half on the diagonal.

Sew the resulting four triangles together as in the photo below.

Cut out the center section of the block, removing the bulk of the intersecting seams.

Out of background fabric, cut a square 5.5" x 5.5" and a square 4.5" x 4.5".
Out of main block fabric, cut a square 5.5" x 5.5" and a square 4.5" x 4.5".
Cut all four squares in half on the diagonal.

Sew the triangles together to form two sections as below.

Now we'll do some applique. I used the "freezer paper on top" method and will describe it here but you can obviously use whichever technique you prefer.
Print or trace the block diagram onto the dull side of freezer paper and cut out the outside circle.
Lining up the seam lines, iron the freezer paper onto the right side of the larger pieced square.
Cut out leaving a 1/4" seam allowance.

Place this circle right side up on the right side of the background fabric section, lining up the seams again. Baste through all layers a little more than 1/4" in from the edge of the freezer paper.

Turning under the seam allowances, applique the circle to the background section.
Remove the freezer paper and press.

Cut out the center section once again.

Using the same freezer paper or a new piece, cut out the smaller circle.
Iron this onto the right side of the smaller pieced square, lining up the seam lines.
Cut out, leaving a 1/4" seam allowance.
Place the circle right side op on the right side of the block, lining up the seams with the seams of the circle you just appliqued.
Refer to the block diagram to make sure the position it correctly. The main fabric sections of the top circle should be on top of the background fabric sections of the bottom circle.
Baste through all layers.

Applique the smaller circle to the block.
Remover the freezer paper and press.
Trim the block to 5" x 5".
Cut away excess bulk from the back of the block.

An easy one.
Out of background fabric, cut 2 squares 6" x 6" and cut each in half on the diagonal.


Out of main block fabric, cut a square 5.5" x 5.5" and a square 4.5" x 4.5".
Cut all four squares in half on the diagonal.


Print or trace the block diagram onto the dull side of freezer paper and cut out the outside circle.
Lining up the seam lines, iron the freezer paper onto the right side of the larger pieced square.
Cut out leaving a 1/4" seam allowance.


Remove the freezer paper and press.


Iron this onto the right side of the smaller pieced square, lining up the seam lines.
Cut out, leaving a 1/4" seam allowance.
Place the circle right side op on the right side of the block, lining up the seams with the seams of the circle you just appliqued.
Refer to the block diagram to make sure the position it correctly. The main fabric sections of the top circle should be on top of the background fabric sections of the bottom circle.
Baste through all layers.

Remover the freezer paper and press.
Trim the block to 5" x 5".
Cut away excess bulk from the back of the block.
Tuesday, December 15, 2009
BR-5
Print or trace the block diagram onto foundation paper, number, and cut out as below.
Important! You have to mirror this diagram.
Also, if you're printing from the software, remember to change the block size to 5"x8" before printing.

Foundation piece all the numbered sections and trim the seam allowances to 1/4".

Referring to the block diagram, sew the smaller sections together to form the main sections of the block.
Sew the resulting sections together.

Important! You have to mirror this diagram.
Also, if you're printing from the software, remember to change the block size to 5"x8" before printing.


Wednesday, December 9, 2009
J-8
I've been unsuccessfully chasing the sun.
This morning I decided I had to get some photos. Please excuse the quality.
It was really dark and all the photos turned out blurry. I tried my best to make them look acceptable.
Print or trace the block diagram onto foundation paper.
You have to mirror this diagram.
Cut out and number the small log cabin sections as in the photo.

Foundation piece the sections and trim the seam allowances to 1/4".
Out of main block fabric, cut a square 2 1/4" x 2 1/4"
Out of background fabric, cut a square 2 1/4" by 2 1/4" and draw a diagonal line corner to corner on the wrong side of the fabric.

Place the main fabric square and background fabric square right sides together.
Sew a seam 1/4" away from the drawn line on both sides and cut on the drawn line.
Press open the two resulting half square triangles.

Referring to the block diagram, assemble the center section of the block.
Be sure to double check. It is easy to assemble this incorrectly.

Out of background fabric, cut two rectangles 1 3/8" x 3 1/4".
Sew a rectangle to the top and bottom of the center block section. Once again, be sure to check the block diagram for accurate placement.

Out of background fabric, cut two rectangles 1 3/8" x 5".
Sew these to the sides of the block.
Press.

Applique the four melons onto the block using main block fabric.
I prefer the "freezer paper inside" method for these.

This morning I decided I had to get some photos. Please excuse the quality.
It was really dark and all the photos turned out blurry. I tried my best to make them look acceptable.
Print or trace the block diagram onto foundation paper.
You have to mirror this diagram.
Cut out and number the small log cabin sections as in the photo.

Out of main block fabric, cut a square 2 1/4" x 2 1/4"
Out of background fabric, cut a square 2 1/4" by 2 1/4" and draw a diagonal line corner to corner on the wrong side of the fabric.

Sew a seam 1/4" away from the drawn line on both sides and cut on the drawn line.
Press open the two resulting half square triangles.

Be sure to double check. It is easy to assemble this incorrectly.

Sew a rectangle to the top and bottom of the center block section. Once again, be sure to check the block diagram for accurate placement.

Sew these to the sides of the block.
Press.

I prefer the "freezer paper inside" method for these.
Wednesday, December 2, 2009
LS-5
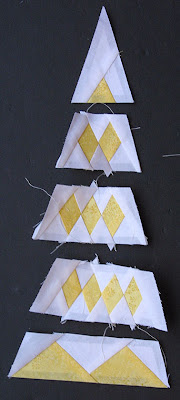
We're a little behind on triangles, I think. Let's have a little triangle marathon...
Print or trace the block diagram onto foundation paper, number, and cut as in the photo.
Note that the top section of the triangle is not included here.
The lines on the section with the half circle have been extended to allow for foundation piecing. We will applique the half circle on later.
Remember to change the block size to 5" x 8" if you're printing from the software.

Foundation piece all the numbered sections and trim the seam allowances to 1/4".

Complete the three block sections by sewing the two sections of each together.

Applique the little half circle. Remember to add the seam allowance at the top so it can be sewn into the seam.

Sew the three pieced block sections together.

Create the top block section by appliqueing the two triangles.
When I did the Rainbow Jane block, I used regular applique and for this block reverse applique because I had trouble getting the point of the tall triangle sharp.
I'm not sure which is better.

Sew all the block sections together.

Print or trace the block diagram onto foundation paper, number, and cut as in the photo.
Note that the top section of the triangle is not included here.
The lines on the section with the half circle have been extended to allow for foundation piecing. We will applique the half circle on later.
Remember to change the block size to 5" x 8" if you're printing from the software.


When I did the Rainbow Jane block, I used regular applique and for this block reverse applique because I had trouble getting the point of the tall triangle sharp.
I'm not sure which is better.

Sunday, November 29, 2009
RS-10
I spent the weekend trying to catch on my two active Janes. In case you didn't know, this is a very, very time consuming project. I need at least one more Thanksgiving weekend.
On to the block...
Trace or print the block diagram onto foundation paper, number, and cut out the top three sections of the block as in the photo.

Foundation piece each section and trim all seam allowances to 1/4".

Cut a piece of main block fabric about 5" x 7". Mark the positions of the background fabric pieces in the bottom block section on the fabric and applique into position. Cut out the block section leaving 1/4" seam allowances.

Referring to the block diagram, sew the four block sections together.

On to the block...
Trace or print the block diagram onto foundation paper, number, and cut out the top three sections of the block as in the photo.


Tuesday, November 24, 2009
H-2
I've implemented some inset seam avoidance here again.
Print or trace the block diagram onto foundation paper, number, and cut out as in the photo.

Trim the seam allowances to 1/4".
Cut the two unnumbered sections out of background fabric, remembering to add 1/4" seam allowance.
I cut the pattern piece out of freezer paper and iron it to the wrong side of my fabric, then cut out the shape, adding the seam allowance.


Press.


Repeat for the other non-pieced section.


Wednesday, November 18, 2009
H-3
I'm trying to catch up...
Is it me or are the blocks getting easier and easier?Print or trace the block diagram onto foundation paper, number, and cut out as in the photo.
I mirrored the block because I wasn't sure whether it should be or not. I have the software, so mirroring blocks is no problem. If the block didn't need to be mirrored it doesn't make a difference anyway.

Foundation piece the four block sections following the numbers, and trim the seam allowances to 1/4".


Voila!

Sunday, November 15, 2009
G-10
I snuck a block in before it got too dark to take photos.
Foundation pieced.
Print or trace the block diagram onto foundation paper, number, and cut out as in the photo.

Following the numbers, foundation piece each section of the block. Trim the seam allowances to 1/4".

Referring to the block diagram, sew the pieced sections together.
If you start with the outside sections and work inwards, you will see where the seams should be aligned.

Subscribe to:
Posts (Atom)