If you follow my other blog, you'll know that we're experiencing a record breaking heatwave out here in the Pacific Northwest. Right now, at 7:30 am, it is 90 degrees in my office/studio/sewing room.
I just can't sew up here and I don't know when I'll be able to again.
As soon as it cools down I'll be making DJ blocks, I promise, but for now I hope you see this as an opportunity to catch up a little if you're behind.
Stay cool!
Thursday, July 30, 2009
Monday, July 27, 2009
LS-10
I'm going to try and catch up on triangles a little, so expect to see more of them over here.
Print or trace the block diagram onto foundation paper, number, and cut out as in the photo.
You have to mirror this diagram.
Software users: remember to change the block size to 5"x8".
If you're not using freezer paper to foundation piece, print or trace the bottom section of the block onto the dull side of freezer paper and cut out.

Foundation piece all the numbered sections and trim the seam allowances to 1/4".

Cut a 3"x10" section out of main block fabric. Cut a 3"x10" section out of background fabric. You can cut these smaller, but I like being on the safe side.
Cut the little triangle shapes out of the freezer paper bottom section.
Iron the freezer paper to the right side of the main block fabric rectangle. Leave enough fabric around the edges to be able to trim the seam allowance to 1/4" later.
Cut out the triangle shapes, leaving a small seam allowance to turn under.
Lay the background fabric rectangle right side up on the table. Lay the main block fabric rectangle (with the freezer paper) right side up on top of it.
Baste layers together firmly.

Turning under the seam allowances, applique around the triangle edges on both sides of the block section. Trim the seam allowances to 1/4".
Remove the freezer paper and cut the excess background fabric away on the back of the block.


Sew the three small block sections together.

Referring to the block diagram, complete the block by sewing all sections together, starting with the bottom section.

Friday, July 24, 2009
BR-4
It must be a summer thing but I seem to always be a day late these days.
This block looked kind of time consuming but once I studied it a little closer it ended up being very, very simple.
Print or trace the block diagram onto foundation paper, number, and cut out as in the photo. (Click on the photo for a larger view since this one is not all that clear.)
Software users remember to change the block size to 5"x8" before printing.

Foundation piece all the numbered sections. Trim the seam allowances to 1/4".

Assemble the block referring to the block diagram.

I know there's a little extra triangle at the top. You can just applique that on but I think I may leave it off because the block looks so nice and clean as is.
Tuesday, July 21, 2009
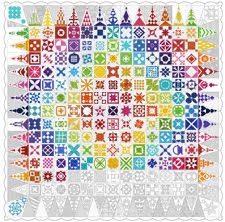
Progress
I thought I'd look at all the progress charts I'd made over the last year or so and see if I can see any progress.
5/22/08

7/23/08

12/09/08

1/27/09

3/16/09

5/11/09

7/20/09

Not bad.
We're going to have to get going on those triangles though.
5/22/08
7/23/08
12/09/08
1/27/09
3/16/09
5/11/09
7/20/09
Not bad.
We're going to have to get going on those triangles though.
Monday, July 20, 2009
J-6
We're strip piecing this one.
Out of main block fabric, cut
2 pieces 2" x 5"
1 piece 1" x 5"
2 pieces 1" x 2"
Out of background fabric, cut
2 pieces 1" x 5"
2 pieces 2" x 2"
1 piece 1" x 2"

Sew the 5" long pieces together as in the photo below.
Sew the 2" long pieces together as in the photo below.
Press all seams toward the darker fabric.

Cut the larger pieced section as follows:
two 2" sections and one 1" section
Cut the smaller pieced section as follows:
two 1" sections
Lay the cut sections out as below.

Following the block diagram, sew the five sections together to form the block.

Saturday, July 18, 2009
Finally - the winners!
It took more than a month but I finally have the gift certificate winners in the "first three rows" givaway.
The random integer generator picked the following quilters who won twiddletails store gift certificates:
Completed and sewn together - $20 gift certificate from the twiddletails store: Karen
Completed but not together - $10 gift certificate from the twiddletails store: Jessica
Congratulations!
Please email me at thatquilt{at}gmail{dot}com and I'll send you details.

Just a reminder that Rainbow Jane signups start in August. If you're interested and would like me to let you know when you can sign up, visit the store and send me an email.
(There's a special offer for blog readers on my other blog today.)
The random integer generator picked the following quilters who won twiddletails store gift certificates:
Completed and sewn together - $20 gift certificate from the twiddletails store: Karen
Completed but not together - $10 gift certificate from the twiddletails store: Jessica
Congratulations!
Please email me at thatquilt{at}gmail{dot}com and I'll send you details.
Just a reminder that Rainbow Jane signups start in August. If you're interested and would like me to let you know when you can sign up, visit the store and send me an email.
(There's a special offer for blog readers on my other blog today.)
Friday, July 17, 2009
G-2
Easy block, but check the fabric color placement carefully. I recommend marking the foundation paper to avoid having to refer back to the diagram.
The pattern also has to be mirrored.
Print or trace the diagram onto foundation paper, number, and cut out as in the photo.
Note that the diagram has been mirrored. You can print/trace it as is but you'll have to mirror the fabric placement.
The little double dashes on my pattern indicate sections to be pieced in main block fabric.
I also marked the sections from top to bottom to help me assemble them.

Foundation piece all the numbered sections and trim the seam allowances to 1/4".

Following the quilt diagram, sew the four strips together.
Tuesday, July 14, 2009
E-4
Finally! This block was a little hard to describe, so let me know if there is any confusion.
Print or trace the diagram onto foundation paper, number, and cut out as in the photo.

Foundation piece all the numbered sections and trim their seam allowances to 1/4".
Also cut the center diamond out of main block fabric, leaving a 1/4" seam allowance.

Sew two matching pieced sections to opposite sides of the center diamond. Start and end you seams about 1/4" from the edge or, if you have your foundation paper still attached only to the end of the seam line.
(I forgot to take a photo here.)
Sew the other two pieced sections to the other two sides of the center triangle, once again starting and ending the seams at the seam lines.


Place a the diagonal corner seams right sides together and sew, starting at the block edge but ending the seam where the seam line ends (where the seams you sewed before meet up. Repeat for the other three corner seams.


Monday, July 13, 2009
There will be two blocks...
...this week.
I apologize for the delay.
Things have been a little wild but I'm definitely planning to make a block today and post it either today or tomorrow morning.
I apologize for the delay.
Things have been a little wild but I'm definitely planning to make a block today and post it either today or tomorrow morning.
Thursday, July 9, 2009
LS-11
Yes, it's triangle time!
Print or trace the block diagram onto foundation paper. Number and cut out the numbered pieces.
If you're not using freezer paper to foundation piece, trace the top and bottom sections of the block onto the dull side of freezer paper.

Cut a 6" x 2.5" piece of main fabric and a 6" x 2.5" piece of background fabric.
Place the bottom freezer paper section on the right side of the background fabric section and, using a disappearing or washable marker, mark the four corners on the fabric. Make sure there's enough fabric around the edges for the seam allowance.
Cut the arc shaped section out of the freezer paper piece. If the top section falls apart, it's OK.
Keep the section you cut out to use later.
Iron the top freezer paper piece to the right side of the background fabric, lining up the corners with the markings on the paper. Cut out along the curve, leaving a seam allowance for turning under. Clip the curve almost to the freezer paper every 1/4" or so.

Place the main fabric piece right side up on the table. Place the background fabric right side up on top of it and baste through all layers.

Turning under the background fabric as you go, reverse applique along the curved edge.

Iron the freezer paper section you cut out and kept back into position.

Cut a piece of background fabric large enough for the top section plus seam allowances.
Cut the small leaf shaped section out of the top freezer paper being careful to leave the rest intact.
Applique the little leaf in main fabric onto the background fabric. Check to make sure that it's not too close to the edge of the fabric.
I used the freezer paper on top method but this leaf is so tiny I'm not sure what the best method would be.

Place the freezer paper section on top of the appliqued fabric, positioning it over the leaf where it should be. Iron the freezer paper onto the fabric.

Foundation piece all the numbered sections.
Trim all seam allowances, including the top and bottom sections, to 1/4".

Assemble the block, referring to the block diagram. I've found that starting from the bottom and checking whether it's straight after each section is sewn on works pretty well.

Monday, July 6, 2009
I-12
I'm so out of fabric for this quilt that I'm having to choose blocks I have fabric for to make. Time for a shopping trip, I think.
Print or trace the block diagram onto foundation paper, number, and cut out as in the photo.

Foundation piece all the numbered sections and trim the seam allowances to 1/4".

Referring to the block diagram, complete the top and bottom sections.

Attach the small triangles to the center sections.

Sew the center sections together.

Once again referring to the block diagram, sew the three block sections together.

Thursday, July 2, 2009
Too hot for a block
It's very hot out here and probably 10 degrees hotter in my sewing room so I've decided we need a little 4th of July break. There will be a new block on Monday.
Happy 4th everyone!

Happy 4th everyone!
Subscribe to:
Posts (Atom)