Thursday, December 9, 2010

Rainbow Jane is back!

I haven't had much time to work on my quilt lately.  I truly hope the New Year will bring better organization and therefore more sewing time.

In the mean time I have an announcement to make.

I've had SO many requests for another run of the Rainbow Jane Block of the Month that I've decided to run another session.

If you or a friend are interested, you can find more details over here in the store.


30's Jane is also in the works.
Stay tuned.

Friday, October 22, 2010

TR-11

Number 225!  Woohoo!

Print or trace the block diagram onto foundation paper, number, and cut out as below.
You have to mirror the diagram!
 Foundation piece all the numbered sections and trim the seam allowances to 1/4". Cut the unnumbered sections out of the appropriate fabric. Remember to add the 1/4" seam allowance here as well.

 Assemble the block following the photos below.


Applique the small top kite into position.
TR-11

Wednesday, October 20, 2010

TR-7

The second to last block!
What am I going to do with my time when this quilt is finished?

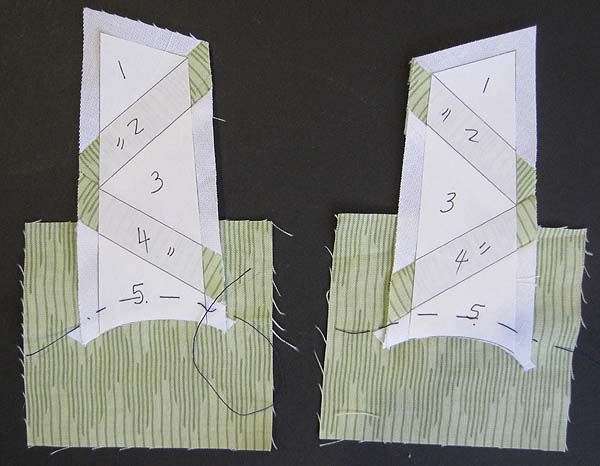
Print or trace the  block diagram onto foundation paper, number, and cut out the sections as below.
Foundation piece each section and trim the seam allowances to 1/4".
Print or trace the block diagram onto the dull side of freezer paper and cut out the sections as below.  Keep the small semi-circles you cut out from the bottom of the sections.
Because I use freezer paper to foundation piece, I just reused those sections.  You don't have to number them.
Iron the freezer paper sections to the right side of the matching pieced sections, lining up the seam lines. Cut along the curved edge, leaving a small seam allowance for turning under. Clip the seam allowance along the curve.
Cut two squares about 3" x 3" out of main block fabric and lay them right side up on the table.
Place the pieced sections right side up on top of them and baste along the bottom curve about 1/4" inside the freezer paper edge.
Reverse applique along the curved edge.
Iron the little freezer paper semi-circles into place and trim the block sections to size along the bottom edge(1/4" outside the freezer paper edges). Cut away the excess fabric from the back of the block sections.
Cut the non-pieced block sections out of appropriate fabric, remembering to add 1/4" seam allowance.
Sew the three bottom block sections together.
Attach the next section.  Yes, inset seams are required.
Attach the small pieced section.  When the angle is this sharp, I sew one seam by machine and applique the other edge. Sounds weird, I know, but it helps me avoid stretching the fabric by trying to manipulate it under the sewing machine foot.
Print/trace the section below onto the dull side of freezer paper, cut out and iron into position on the right side of the block. Cut out the inside of the kite, leaving a seam allowance for turning under.
Cut a 4" x 4" square out of background fabric and lay it right side up on the table.  Place the block right side up on top and baste through all layers.
Reverse applique, turning the seam allowances under.  Remove the freezer paper and  basting and trim away the excess fabric from the back.
Sew the two side strips to the block and finally attach the top triangle.
TR-7

Monday, October 18, 2010

BRC

The bottom right corner.  The last corner.

This is what I did.  I'm sure there are other methods out there.  Please share if you have a better idea.

Print or trace the block diagram onto paper. It's 8" x 8" if you were wondering.
Cut a piece of background fabric large enough for the block plus seam allowances.
Trace the positions of the star and lemons, as well as the seam lines onto the fabric using a disappearing or washable marker. I have a wonderful little light table which I can't live without but a bright window will work as well.
Print or trace the block diagram onto foundation paper. Actually if you're tracing you can just trace the star.
Connect the corners as below, cut out, and number.
Cut out the sections.
Foundation piece each section.
Trim the seam allowances where the sections will be attached to 1/4".  Leave the outer seam allowances larger.  This will make it easier to secure in the next steps.
Sew the sections together to form the star shape.
Lay the star right side up on the light table or against the window. Place the background fabric with the markings right side up on top of it. Line up the outside border of the pieced star with the markings on the background fabric. I completed the borders of the star on the background fabric to make this easier.
Baste through all layers.  Do not baste too close to the star.  You want to be able to turn the seam allowances under.
Reverse applique along the star borders.  I cut the center out as I went along because the shape is so little and I wanted as little fraying as possible.
If you want a little more detail on reverse applique, have a look at block B-1.

Applique the melons onto the block.

Cut out the block 1/4" outside the marked seam lines.
BRC - Bottom Right Corner
The star is a little chunky and the corners not perfect but I gave up on complete perfection about 200 blocks ago.

Saturday, October 16, 2010

RS-5

The last right side triangle!

Print or trace the block diagram onto foundation paper, number, and cut out as in the photo.
Foundation piece each numbered section and cut the unnumbered section out of main block fabric. Trim all seam allowances to 1/4".
Sew together the top two and center three sections as below.
Sew the top and center sections together.
Attach the bottom pieced section,
Attach the non-pieced section.
Using your favorite applique method, applique the melon onto the block.
RS-5

Thursday, October 14, 2010

TLC - Top Left Corner

The top left corner.  Corners are 8" x 8" finished.

Print or trace the block diagram onto the dull side of freezer paper and cut out the hexagons.
Iron nine of the hexagons to the wrong side of main block fabric and trim all the seam allowances to exactly 1/4".
Fold all seam allowances over to the wrong side and secure with a couple machine stitches.  Do not use too many stitches.  You are going to have to undo these at the end.
Sew the hexagons together in groups of three.
Sew these groups together.
Cut a 6" x 6" square out of background fabric and baste the hexagon section to the right side of the square.
Applique along all the folded edges. Remove the basting stitches, machine stitches, and freezer paper.  Trim the square to 5 1/8" x 5 1/8".
Print or trace the block diagram onto foundation paper, number, and cut out the section below.
Foundation piece and trim seam allowances to 1/4".  Cut the remaining section out of background fabric.  Remember to add 1/4" seam allowances.
Sew the non-pieced section to the bottom of the main block section.
Sew the pieced section to the side.
Out of background fabric, cut two strips 7/8" x 7".
Referring to the block diagram, attach the strips to two of the block's sides.
I found the easiest way to do this is to attach each strip and then trim it to size on both ends.
Applique the remaining hexagon onto the block.
TLC

Tuesday, October 12, 2010

RS-3

5 blocks to go!!!

Cut two 2.5" x 2.5" squares out of main block fabric.
Cut two 2.5" x 2.5" squares out of background fabric.
Draw a diagonal line corner to corner on the wrong side of two of the squares.
 Sew squares together in pairs 1/4" from the diagonal lines on each side.
Cut apart on the drawn lines and press open.
Lay out as below and sew together to form a pinwheel. (I forgot to take a photo of the actual pinwheel.)
Trace or print the block diagram onto foundation paper and number as below. The center will be sewn as one piece.
 Foundation piece as below. Trim the seam allowance to 1/4"
 Print or trace the block diagram onto the dull side of freezer paper and cut out the shapes as in the photo.
Iron the melon shapes onto the right side of your main block fabric and cut out. Leave about 3/8" seam allowance along one curved edge and at least 1/2" at the bottom and sides. I left at least an inch.
Iron the center freezer paper shape to the right side of the pinwheel you constructed earlier, lining up the seam lines.
Place one of the melon sections right side up on the pinwheel, aligning the curved edges on both freezer paper cutouts.  A light table or bright window will be very helpful when doing this.  Baste through all layers.
Applique along the curved edge, turning under the seam allowance. Remove the freezer paper melon and press.
 Repeat for the other three melons.
Applique the small triangle to the foundation pieced block section.  Note that you only have to applique the sides of the triangle.  The bottom will be in the seam allowance.
Trace the center circle onto the dull side of freezer paper and cut out, leaving a "frame" of at least 1/4" all around.
Iron the freezer paper into position on the right side of the block and cut out, leaving a seam allowance for turning under.
Place the appliqued block section right side up on the table.  Carefully position the block over it.  Baste through all layers.
Clip the curved edge every 1/4" to 1/2". Applique along the curved edge.
Remove the freezer paper, press, and trim away the excess fabric from the back of the block.
Applique the three kites onto the block.
Cut a 7/8" by 6" strip of main block fabric and sew it to the bottom of the block.  Trim to size.
RS-3