Thursday, July 29, 2010

H-5

I think I'm on a little roll here...

Print or trace the block diagram onto foundation paper, number, and cut out as in the photo below.
Foundation piece each section. Trim the seam allowances to 1/4".
Sew together the two center block sections.
Attach the side sections.
H-5

Tuesday, July 27, 2010

H-4

Getting there...

Print or trace the block diagram onto foundation paper, number, and cut out as in the photo. Note that I extended the center diagonal line all the way across.
Foundation piece the two block sections. Trim the seam allowances to 1/4".
Sew the two sections together.
Applique the kite into position. I prefer "freezer paper inside" for kites.
H-4

Friday, July 23, 2010

G-13

Another easy one.

Print or trace the block diagram onto the dull side of freezer paper and cut out the four sections that have a curved edge.
Out of background fabric, cut 4 squares 2.5" x 2.5"
Iron a freezer paper shape to the right side of the fabric, in the center of each background square.
Cut out the curved edge, leaving a scant 1/4" seam allowance. Clip the inside curve.
Out of main block fabric, cut 4 squares 2.5" x 2.5".
Lay the main fabric squares right side up on the table. Lay the background fabric sections right side up on top of them.
Baste through all layers, staying far enough from the freezer paper edge to allow for the seam allowance to be turned under.
Reverse applique each curve.
Trim the squares to size 1/4" away from the freezer paper edge on all sides. They should be 2" x 2".
Remove the freezer paper and trim away the excess main block fabric from the back of each section.
Out of main block fabric, cut 5 squares 2" x 2".
Lay the block sections out as below.
Sew the sections together in sets of three, resulting in three rectangular block sections.
Sew these sections together.
G-13

Sunday, July 18, 2010

Yes I am...

...going to to finish this quilt and blog about it.

Right now I'm working eight hour days and taking two college classes (and trying to run a store) so time is a little tight. I'm planning to do something about the eight hour days soon. I will definitely be posting a block or two this coming week.

I'm afraid this little Jane will not be finished by the end of the summer though.  Maybe by the end of the year...

Wednesday, July 7, 2010

M-3

I wanted to name this post "Woo-hoo!" but since I have a naming convention...
I finished "the block". The hard one. The one I simply could not figure out.
What follows is what I did and not necessarily the best method.

One thing I know: try to sew as accurately as possible. Even the teeniest misstep can result in big problems.

Print or trace the block diagram onto foundation paper, number, and cut out the sections as below.
If you're using freezer paper for foundation piecing keep the "frame" part of the block diagram intact, else trace or print the block diagram onto the dull side of freezer paper and cut out the "frame".
Foundation piece the three sections and trim the seam allowances to 1/4".
Don't worry about the sharp points of the sections. They aren't going to show.
Sew the three sections together.
Mark the four kite sections on main block fabric.  NOTE that they're not symmetrical. Take note of which side will face the center of the block.
Cut the kite sections out only along the two seams that face toward the center of the block.  Leave ample fabric on the other sides (at least 1/2" beyond the seam lines of the kite).
Sew the four sections into the appropriate areas on the block.
Sew only the two "inside" seams.
Yes, you will have to use set in seams.  (Sorry.)
Cut four 4" squares out of background fabric.
Use these to make four half square triangles.
Sew them together as if you're making a pinwheel.
Iron the freezer paper frame you made in the beginning to the right side of the block, lining up the seam lines.
Cut out the center section, leaving a scant 1/4" seam allowances. Clip the inside corners. (Actually you can just unpick the seams up to the freezer paper edge.)
Place the foundation pieced block section right side up on the table.
Place the "frame" section right side up on top of it, carefully centering it.
Baste through all layers at least 1/4" away from the freezer paper frame edge.
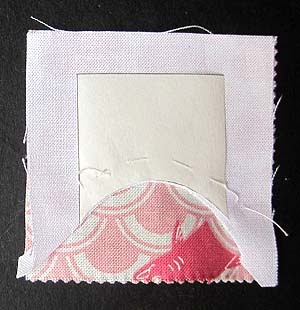
Turning under the seam allowances, reverse applique the "frame" to the block center.
Trim the block to 5" x 5", i.e. 1/4" beyond the freezer paper edge on all sides. Remove the freezer paper.
Cut away any excess fabric from the back of the block.
Press.
Woo-hoo!
M-3

Thursday, July 1, 2010

G-11

Two blocks in one week!
And we can now officially say we're 90% done with the blocks.

Out of background fabric, cut:
two pieces 1 3/4” x 2 1/2”
one piece 2 1/2” x 3 1/2”

Out of main block fabric, cut:
two pieces 1 3/4” x 3 1/2”
one piece 2 1/2” x 2 1/2”
Sew the three 3 1/2” long pieces together.
Sew the three 2 1/2” long pieces together.
Cut the larger pieced section into two 1 3/4” wide sections.
Sew the three pieced sections together.
Using the applique method you prefer, applique the four kites onto the block.
I used "freezer paper inside".
G-11