Thursday, September 30, 2010

L-12

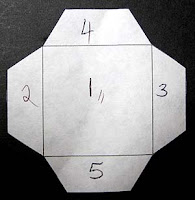
Print or trace the block diagram onto foundation paper, number, and cut out as below.
Foundation piece each numbered section.  Note that I had to rearrange the sections a little to resemble the block diagram. If I'd wanted it simpler I should have mirrored the diagram but this worked as well.  Just make sure to refer to the block diagram when you lay out your sections.
Out of background fabric, cut
two rectangles 1 1/4" x 3 1/2"
two rectangles 1 1/4" x 5"
 Sew the three center sections together.
 Sew the three rectangular pieced center sections together.
 Attach the shorter background fabric rectangles to the sides and the longer ones to the top and bottom of the center section.
Applique the four small triangles into position.  My applique techniques still leave a lot to be desired, that's for sure.
L-12

Tuesday, September 28, 2010

J-5

Before I start this post I want to repeat something I have said before.
The instructions I post on this blog reflect the way I made my blocks.  This is probably not the only method you can use to make your block.  Just what worked for me.
Print or trace the block diagram onto foundation paper, number, and cut out the small center section as below.
If you use freezer paper to foundation piece, like I do, cut it out carefully and keep the rest of the diagram intact.
 Following the numbers, foundation piece the section.  Trim the seam allowances to 1/2". I trimmed mine to 1/4" but this made it a little harder later on. Note that I did not trim the section according to the diagram, just straight across.
 Print or trace the block diagram onto the dull side of freezer paper and cut out the sections as below.
Iron the sections onto the wrong side of the appropriate fabrics and trim the seam allowances to 1/4".
Sew a smaller block section to a larger section as below, lining it up carefully. Note that I did not sew into the seam allowances on either end of the seam.
Press open, pressing the seam allowance toward the LARGER block section. (I know that is not what it looks like below.)
 Repeat for all the remaining sections.
 You now have a "frame" for your block.
Turn all the inner seam allowances under 1/4" and baste.  The freezer paper on the wrong side of the fabric will give you a hard edge making it easier. Baste through the freezer paper.
Place the small block section you made at the beginning right side up on the table.  Place the larger section right side up on top of it, lining it up carefully according to the block diagram.
Baste through all layers.

Applique along the inner edge.
Remove the basting and freezer paper.
L-12

Sunday, September 26, 2010

BR-10

I'm very determined to finish all the blocks ASAP.
So far, so good...
Print or trace the block diagram onto foundation paper, number, and cut out as below.
Important: You have to mirror this diagram.
Foundation piece each numbered section and trim all seam allowances to 1/4".
 Sew the two center sections as well as the top right sections together as in the photo.
 Sew the three top sections together.
Sew the three resulting block sections together.
BR-10

Saturday, September 25, 2010

I-13

Print or trace the block diagram onto foundation paper, cut out, and number as below.
 Foundation piece all the numbered sections and trim the seam allowances to 1/4".
Out of main block fabric, cut two rectangles 7/8" x 2 7/8".
 Sew the three center sections together.
 Attach the two main fabric rectangles to opposing sides of the center section.
 Sew on the two rectangular pieced sections.
 Sew two of the remaining pieced triangles to opposing sides of the center.
 Finally, attach the remaining two triangular sections.

Monday, September 6, 2010

L-10

Block number 210!

Print or trace the block diagram onto foundation paper, number, and cut out as in the photo. Note that two of the small triangles in each side section are not numbered and won't be included at this point. (See the second photo)
Foundation piece all the numbered sections and trim the seam allowances to 1/4".
Sew the smaller sections together as in the photo below.
Attach the top and bottom sections.
Sew the resulting sections to the center pieced section. Yes, you'll have to use inset seams. I found that in this case the easiest way was to sew the center straight seam first and then the two angular seams.
Attach the side sections.
Trace or print the smaller triangles onto foundation paper in sections as below. Number as in the photo. I placed them on the block to help you see which triangles I was referring to.
foundation piece the small sections and trim the seam allowances. I trimmed the edge to1/4" but then later trimmed them down to allow for easier turning under when appliqueing.
Applique the sections into position on the block along the three sides that do not align with the block edge.
I love this block even though my applique leaves a bit to be desired.